Outside Corner Application of adhesive film: Visible option
Description
We have already spoken in another tutorial on how to apply our film on corners and edges.
There are three basic ways for the application on the corners and in this tutorial we see the method known as “visible”. Very similar to the European method for most of the stages except you can leave the part at an angle in view. We see the following as the execution is carried out.
APPLICATION PROCEDURE
“Visible” corner
LEVEL
Easy / Medium
APPLICATION TOOLS
Cutter
Hair dryer or heat gun
Artesive Squeegee
Caution. Video Tutorial
Also we want to show the technique through video illustrating the procedure in a precise manner. We used a small piece of film on a regular corner. In your case the process will be carried out on the surface you are covering.
The procedure is simple and is preferable when the angle on which you work on is precise and defined.
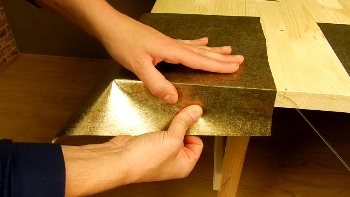
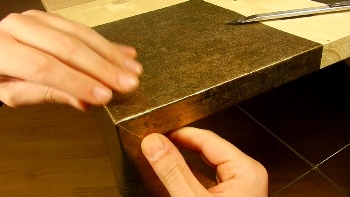
After applying the film on the flat surface, firstly, decide which side of the film’s border remains in excess and therefore needs to be cut.
Remember: unlike the European version the most visible is in this case “close” to the end, so always think before starting execution.
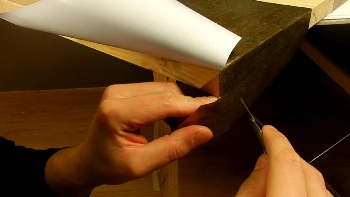
We always leave approximately 4/5 cm on each side. We proceed with fixing the coating along the edge of the most prominent side, using the heat gun to warm slightly and secure better across the board.
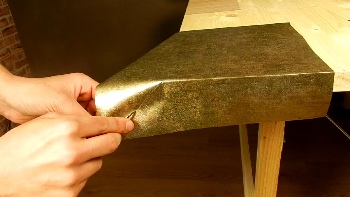
We do not close the lower side, so leave it open.
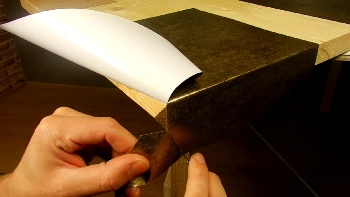
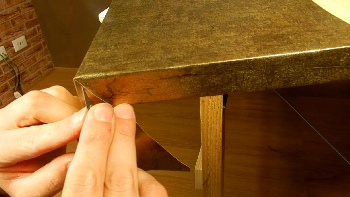
We take our cutter (preferably with long blades) and apply a cut of about 45 °, starting from the top point of the angle to the end of the film.
ATTENTION: this cut needs to be done very precisely. When done right the rest comes naturally. How’s that? In theory, the exact centre of the upper approx 45 ° tilt, slightly less than too open ended. We suggest you cut starting slightly above the centre of the angle instead of slightly below as in this case, can still be trimmed correctly, however, if you cut too much in, it is almost impossible to recover.
This step comes with practice and making small mistakes is normal if you’ve never done it before. Remember that in 80% of cases, small defects are not noticed.
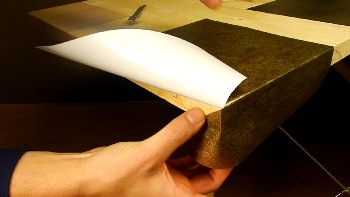
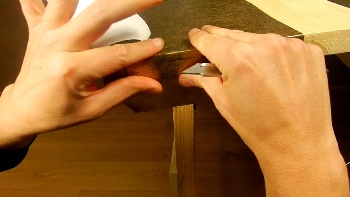
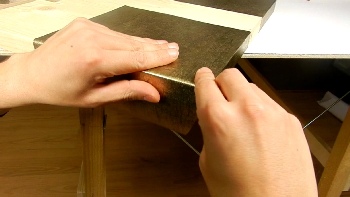
We then apply the part with the 45 ° cut on the opposite edge.
The method of “on demand” expected at this point that the corner is not cut at 45 °, but is simply trimmed off the excess and closed the lower edge. Subsequently covering with the other part of the film will remain so in view, but will not notice the cut line. Let’s see the next steps and you will understand.
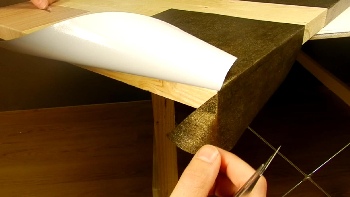
Now cut horizontally the part of the film which exceeds the corner and cut down to 30 ° and apply the bottom of the film on the opposite side of the surface.
After applying the film on the first edge close the side less visible, which of course will always have an angle of 45°.
We apply the film on the board but do not attach to the opposite side, leave it open.
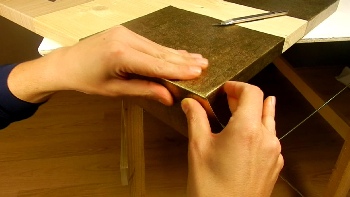
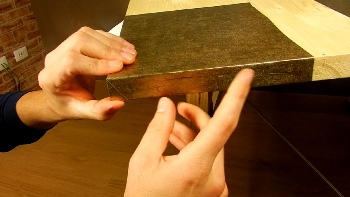
Adjust the corner if it is not perfectly straight and close like we did before, that is, cutting the excess film and closing the bottom edge on this side.
Here’s how it looks. The corner in view will have a cutting line more visible, but if done properly will still be pleasing to the eye, while the side view will be covered in more and less visible.
Done. Your angle is completed.
See the full Video
ATTENTION: In the video we did a lot of attention to perfection of execution deliberately, because our priority was to show the correct steps to be performed.
The application of the film is a technique to be learnt and perfection comes with practice. It is possible to correct mistakes, so do not be discouraged if your corner is not perfect initially, it is normal !!
Try and try again if you are a beginner and ask for advice if necessary. We are here for.
To take advantage of promotions and exclusive offers! By subscribing you agree to our Terms, Privacy & Cookies Policy.
We use cookies on our website to give you the most relevant experience by remembering your preferences and repeat visits. By clicking “Accept”, you consent to the use of ALL the cookies. Read moreOKCOOKIE SETTINGSREFUSE
Cookies Policy
Privacy overview
This website uses cookies to improve your experience while browsing the website. Of these cookies, cookies that are categorized as necessary are stored on your browser as they are essential for the basic functionality of the website to work. We also use cookies to third parties that help us analyze and understand how you use this website. These cookies will be stored in your browser only with your consent. You also have the option to disable these cookies. But disabling some of these cookies could have an effect on your browsing experience.
These cookies are essential to allow the user to move around the site and use the requested services, such as access to protected areas of the site.
Essential cookies are first party cookies and can be permanent or temporary. We use this type of cookie to manage the registration and access phase by users. Without these cookies the user would not be able to access the requested services and our sites would not function properly.
Cookie
Duration
Description
viewed_cookie_policy
The cookie is set by the GDPR Cookie Consent plugin to store whether or not the user has consented to the use of cookies. It does not store any personal data.
_GRECAPTCHA
This cookie is set by the Google recaptcha service to identify bots to protect the website against malicious spam attacks.
__stripe_mid
Stripe sets this cookie cookie to process payments.
__stripe_sid
Stripe sets this cookie cookie to process payments.
Advertisement cookies are used to provide visitors with relevant ads and marketing campaigns. These cookies track visitors across websites and collect information to provide customized ads.
Cookie
Duration
Description
test_cookie
The test_cookie is set by doubleclick.net and is used to determine if the user's browser supports cookies.
VISITOR_INFO1_LIVE
A cookie set by YouTube to measure bandwidth that determines whether the user gets the new or old player interface.
YSC
YSC cookie is set by Youtube and is used to track the views of embedded videos on Youtube pages.
yt-remote-connected-devices
YouTube sets this cookie to store the video preferences of the user using embedded YouTube video.
yt-remote-device-id
YouTube sets this cookie to store the user's video preferences using the embedded YouTube video.
yt.innertube::nextId
This cookie, set by YouTube, records a unique ID to store data on which YouTube videos the user has seen.
yt.innertube::requests
This cookie, set by YouTube, registers a unique ID to store data on what videos from YouTube the user has seen.
Analytical cookies are used to understand how visitors interact with the website. These cookies help provide information on visitor numbers, bounce rate, traffic source, etc.
Cookie
Duration
Description
CONSENT
YouTube sets this cookie via embedded YouTube videos and records anonymous statistical data.
_ga
The _ga cookie, installed by Google Analytics, calculates visitor, session and campaign data and also tracks site usage for the site analysis report. The cookie stores information anonymously and assigns a randomly generated number to recognize unique visitors.
_gat_UA-4724697-18
A variant of the _gat cookie set by Google Analytics and Google Tag Manager to allow website owners to track visitor behavior and measure site performance. The template element in the name contains the unique identity number of the account or website it refers to.
_gcl_au
Provided by Google Tag Manager to test the advertising efficiency of websites using their services.
_gid
Installed by Google Analytics, the _gid cookie stores information about how visitors use a website, also creating an analytical report of the website's performance. Some of the data that is collected includes the number of visitors, their origin and the pages they visit. anonymously.
 Wood Effect Vinyl Films
 Stone Effect Vinyl Films
 Solid Colours Vinyl Films
 Window Films
 Modern Vinyl Films
 Specials Films